
Table of Contents
- Why Painting Older Homes in South Florida Is Different
- What the Climate Does to an Older Exterior
- Prep Work for Peeling Paint on Older Homes
- The Best Exterior Paint for Salt Air and High Humidity
- Stucco, Masonry, and Wood: Matching the Coating to the Substrate
- Permits, Historic Districts, and HOA Rules
- Color Selection for Older Homes and Historic Architecture
- What It Costs to Paint a Historic Home Exterior
- When to Schedule the Work and How to Maintain It
- Frequently Asked Questions
Last Updated: October 1, 2026
Why Painting Older Homes in South Florida Is Different
Painting older homes in South Florida is a different job than painting a newer house almost anywhere else. Year-round humidity, intense UV, salt air near the coast, and the porous stucco and masonry common in pre-1970s construction degrade ordinary paint in a fraction of the time.
What the Climate Does to an Older Exterior
South Florida’s climate attacks an exterior on three fronts. Humidity keeps walls damp for much of the year, driving mildew and weakening adhesion. UV breaks down the binder in lower-grade coatings, causing chalking and oxidation. Near the coast, salt air accelerates the process and attacks metal flashings, fasteners, and railings.
The most common mistake on an older exterior is sealing a damp wall with a heavy, low-permeability coating. Trapped moisture pushes the paint off from behind, and the failure appears within a season or two. Test for moisture before you coat, not after.
Prep Work for Peeling Paint on Older Homes
Prep work is where an exterior paint job on an older home succeeds or fails, and it typically consumes more time than the coating itself. Peeling, flaking, and chalking paint must be removed back to a sound edge, painting over failing paint transfers the failure to the new coat.
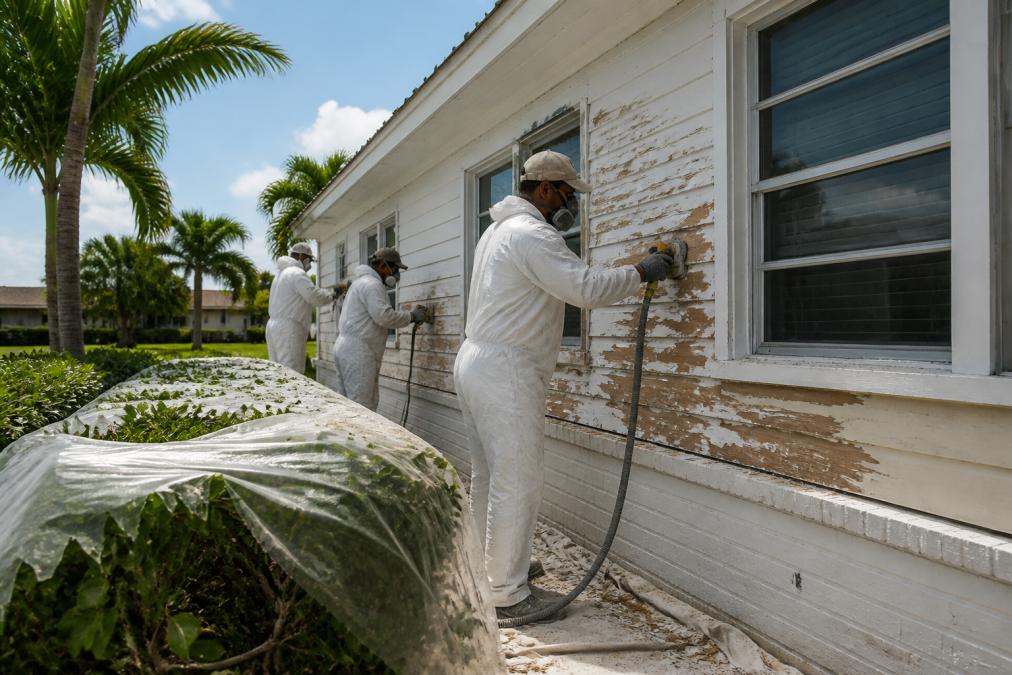
- Test for lead before any sanding or scraping on pre-1978 construction.
- Wash the surface with pressure washing to remove salt, dirt, mildew, and chalk.
- Scrape and sand loose and failing paint back to a firm edge.
- Repair the substrate: patch stucco, fill cracks, replace rotted wood trim.
- Treat for mildew with a fungicide additive or wash, then let it dry fully.
- Caulk and seal joints, seams, and gaps around trim and openings.
- Prime bare and repaired areas with the correct primer for the substrate.
Lead Paint Testing and Safe Removal
Homes built before 1978 may contain lead-based paint, and disturbing it during prep creates a serious health hazard, particularly for children and pregnant women. It is the safety step most guides skip, and the one that carries legal weight.
The Best Exterior Paint for Salt Air and High Humidity
The best exterior paint for salt air and high humidity is a high-quality 100% acrylic coating formulated for masonry and coastal exposure, applied over an alkali-resistant or masonry primer. Acrylics stay flexible, resist mildew when a fungicide is added, and tolerate the movement of an older wall far better than oil-based or low-grade products.
- Standard acrylic latex: fine for sheltered surfaces, but it will not hold up long on a fully exposed coastal wall.
- 100% acrylic exterior: the baseline for a durable job on masonry and wood.
- Elastomeric coating: a thick, flexible membrane that bridges hairline cracks, best on sound stucco and masonry.
On a coastal home, spend the money on the coating, not the number of coats. Two coats of a 100% acrylic over a proper masonry primer will outlast three coats of a cheap product every time.
Elastomeric Paint vs. Standard Acrylic
Elastomeric paint is a thick, rubber-like coating that stretches and bridges small cracks in stucco and masonry. Standard acrylic is thinner, breathes more readily, and suits wood siding and surfaces that need to release moisture.
Stucco, Masonry, and Wood: Matching the Coating to the Substrate
Matching the coating to the substrate is the technical core of any exterior job on an older home, and where generic advice falls apart. Each material has different porosity, movement, and pH, and each demands a different primer.
- Stucco: porous and often alkaline. Use an alkali-resistant primer to prevent burn-through and efflorescence, then a breathable acrylic topcoat. Repair cracks and hollow areas first.
- Masonry and concrete block: similar to stucco, but watch for surface oxidation and salt deposits. A masonry primer improves paint adhesion and blocks alkali.
- Wood siding: prime all bare wood, caulk seams, and use a flexible acrylic that moves with the boards. Address rot before coating.
Permits, Historic Districts, and HOA Rules
- Local historic preservation boards. Homes inside a locally designated historic district, or individually landmarked, typically require a Certificate of Appropriateness (COA) before exterior color, finish, or material changes. The board reviews the application against preservation standards, and approval can take weeks. Painting an unapproved color and then applying for forgiveness is a common and expensive mistake.
- Homeowners associations. An HOA can impose an approved color palette, finish sheen, and even a specific product line. Architectural review committees often require a sample panel painted on the actual wall before sign-off.
- Building and permitting departments. A straight repaint usually does not need a permit. But once the scope expands to major stucco repair, structural prep, or replacing rotted trim and siding, many jurisdictions require a building permit, and some require a separate permit for pressure washing that discharges into storm drains.
A practical sequence before any coating is ordered:
- Pull the property’s designation status from the local planning or historic preservation office. Ask whether it is in a locally designated district, a National Register district, or both, the two carry different review triggers.
- Request the HOA’s architectural guidelines in writing, including the approved palette and any sheen or product restrictions.
- Confirm with the building department whether the planned scope crosses the permit threshold.
- Submit the COA or architectural application with color samples and product data sheets, not just color chips.
Approval timelines are the hidden schedule risk on historic homes. A COA or HOA review can add several weeks before a brush touches the wall, and starting prep work before approval can void the application. Build the approval window into the project calendar, not around it.
One more layer: if the home was built before 1978, federal lead renovation rules apply regardless of historic status, and some jurisdictions require the contractor to hold specific certification before a permit is issued. Confirm both the preservation approval and the lead certification before scheduling.
Color Selection for Older Homes and Historic Architecture
Color selection for older homes should respect the architecture rather than fight it. Historic South Florida styles, including the Florida cracker style and Mediterranean-influenced masonry homes, were designed around specific palettes: warm neutrals, muted earth tones, and contrasting trim detailing.
A few principles that hold up:
- Match the era. Research the home’s original palette where possible, or choose colors consistent with its architectural heritage.
- Use contrast deliberately. Body, trim, and accent colors should work as a set, not compete.
- Test in place. Colors shift under South Florida’s light. A swatch that looks right indoors can read completely differently on a sunlit wall.
What It Costs to Paint a Historic Home Exterior
- Square footage and height of the exterior surface. Two-story walls, gables, and tall parapets require scaffolding or lifts, which is a labor and equipment line item, not a paint line item.
- Condition of the substrate and how much prep is required. Prep is routinely the largest single cost on an older home, and it is the line most likely to grow once the wall is opened up. Failing paint that must be scraped back to a sound edge, cracked or hollow stucco, and rotted trim all add labor hours before a single coat goes on.
- Lead paint presence and the safety protocols it triggers. Lead-safe work practices add containment, personal protective equipment, HEPA filtration, and regulated disposal. On pre-1978 housing this is not optional, and it is a real cost line.
- Coating type. A standard acrylic system, a 100% acrylic system, and an elastomeric system sit at different price points, and elastomeric also requires a compatible primer and a sound, dry substrate.
- Access, masking, and landscaping protection. Mature plantings, screened lanais, and decorative ironwork all add masking and protection time.
- Historic district or HOA requirements. Required sample panels, board-approved products, and approval-driven scheduling can add cost and delay.
How the estimate is usually built:
- Measure the paintable exterior area, not the footprint. Wall area, trim linear footage, and soffit and fascia are measured separately.
- Assess substrate condition and assign a prep level, light, moderate, or heavy.
- Confirm lead status and add the applicable safety protocol.
- Select the coating system and primer for each substrate.
- Add access equipment, masking, and disposal.
Ask any contractor to break the estimate into prep, materials, and labor as separate lines. A single lump-sum number hides the prep scope, which is the line most likely to change once work begins. A transparent estimate shows the prep assumption in writing.
Because these variables vary so much from home to home, the honest answer is a site assessment rather than a per-square-foot guess, but the assessment should produce a written scope naming the prep level and coating system, not a verbal range. Details Paint Co provides customized solutions and competitive pricing based on the actual condition of the property, with current figures available on our website.
When to Schedule the Work and How to Maintain It
The dry season is the right window for exterior painting on an older South Florida home. Lower humidity and fewer afternoon storms let coatings cure properly and reduce the risk of moisture trapped under a fresh film.
| Timeframe | Task | Why It Matters |
|---|---|---|
| Annually | Inspect for peeling, caulk gaps, mildew | Catches failure before it spreads |
| Annually | Wash exterior to remove salt and chalk | Preserves coating and appearance |
| Every 2-3 years | Re-caulk joints and seams | Blocks water intrusion at openings |
| Every 5-8 years | Plan a full repaint | Matches coating lifespan in this climate |
Frequently Asked Questions
What is the best month to paint a house exterior in South Florida?
The dry season, roughly November through April, is the safest window. Humidity is lower, afternoon storms are less frequent, and most coatings need surface and air temperatures between 50°F and 85°F with no rain for 24 to 48 hours after application. Summer work is possible, but crews have to watch radar hourly and may need to stop mid-wall if a storm rolls in. Scheduling in the dry season also means fewer weather delays and a smoother project timeline for occupied homes.
How do I know if my older home has lead-based paint?
Homes built before 1978 are the concern. You cannot tell by looking. A certified inspector or a DIY test kit can confirm it. If lead is present, the work falls under the EPA’s Renovation, Repair and Painting (RRP) Rule, which requires a certified firm and lead-safe practices like containment, wet sanding, and HEPA cleanup. Ask any contractor for their RRP certification before work starts. Never dry-scrape or power-sand suspected lead paint, because that spreads dust that is hazardous to your family and neighbors.
What is the best exterior paint for salt air and coastal humidity?
A 100% acrylic latex with mildewcide additives and UV-stable pigments holds up best. Near the coast, an elastomeric coating on stucco or masonry can bridge hairline cracks and block wind-driven rain. For wood siding, a quality acrylic primer plus two topcoats is standard. Look for products labeled for coastal or high-humidity exposure, and confirm the finish: satin or semi-gloss clean better and resist mildew more than flat. For painting older homes in South Florida, the coating matters less than the prep underneath it.
How much does it cost to paint a historic home exterior in South Florida?
Cost depends on square footage, number of stories, substrate condition, amount of prep, and whether lead-safe or historic-district rules apply. Older homes almost always need more prep than newer ones, so quotes can vary widely between contractors. Details Paint Co offers a free consultation and pricing on our website, and a site visit is the only way to get an accurate number. Get at least two written quotes that itemize prep, primer, and topcoats separately so you can compare fairly.
An older South Florida home asks more of a paint job than a newer one: lead-safe prep, the right primer for each substrate, a coating built for salt and sun, and a schedule that keeps it ahead of the climate. That is the work Details Paint Co does every day, backed by fully licensed and insured crews, customized solutions tailored to each property, and expert color consultation to get the palette right the first time. Get a free consultation and protect the home you have.


